How To Perform 192.168.0.1 Login?
192.168.0.1 Login admin panel lets you manage your wifi router’s configuration settings. You can also manage login and network settings by logging into the 192.168.0.1 web page. In this blog, we will explain to you the process for 192.168.0.1 login, along with some essential points to avoid mistakes during the login. Read the blog carefully and log into the 192.168.0.1 admin panel page to modify the router’s settings.
Steps For 192.168.0.1 Setup -
You need an active internet connection to set up your router on192.168.0.1 login page. Follow these easy steps for 192.168.0.1 setup;
- Step 1. First of all, check out the internet connection of your device.
- Step 2. Make sure it is properly connected through the wired or wireless mode of connection.
- Step 3. On your device, open the default internet browser.
- Step 4. In the web address field, enter the IP address 192.168.0.1 and press the enter key to proceed.
- Step 5. You will be taken to the 192.168.0.1 login web page of the wifi router.
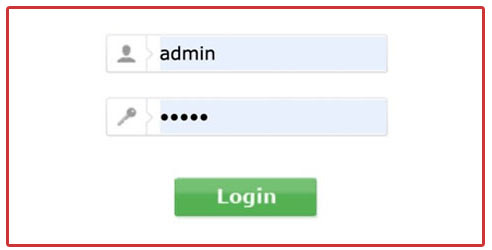
- Step 6. On this page, enter your wifi router’s default username and password.
- Step 7. This will take you to the configuration settings page, where you can modify the original settings.
Mistakes To Avoid -
The users often make mistakes while setting up which doesn’t let them access 192.168.0.1 Login page. Here we have mentioned certain situations in which users make mistakes, so keep them in mind while you log into 192.168.0.1;
- The IP address is fully numeric. Make sure you don’t write the alphabet O in place of the number 0.
- You must not write www.192.168.0.1. The router admin page does not have a ‘www’, rather http //192.168.0.1/login.
- The symbols ‘.’ used in the IP address are dots so do not use any other symbol as it will not open the router login web page.
- If the wifi router shuts down during the 192.168.0.1 setup then the process won’t complete, so make sure there is a consistent power supply and stable internet connection
- The 192.168.0.1 login admin can be blocked by some firewall rules or ICMP packet filtering. In that case, disable the firewall during the login process of the router.
- Ensure that 192.168.0.1 login is the default address of the router you are trying to set up so that you don’t face any discrepancy. Every router has a different IP address assigned to it.
Login Successful!
After going through the above blog, you can complete the 192.168.0.1 login admin. The essential steps to keep in mind to easily access 192.168.0.1 login page hassle-free are a bonus. If you follow all the points properly without making an error, then you can manage and configure the settings of your wifi router. In case you need help with something else, then our team is just a message away. Tell us your problem and we will make sure it is solved in the shortest possible time.


Comments
Post a Comment